Welcome to Lisa's Crafty Place. You have arrived here from Stamping Fun with Kim but if not, you can start at the very beginning by going here - VC Rocks Blog.
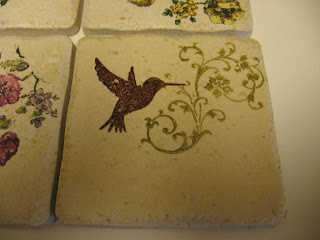
For this first blog hop, I decided to share with you all the tile coasters I made last week along with a tutorial. These have been pretty popular so this probably isn't the first time you have seen these. When I first saw these, I knew that I had to make tons, to share with son's teacher's this year. He is leaving his elementary school this year and moving on to Intermediate school. I can not believe I have a rising 5th Grader. I did this with my club girls and they all loved them. They are pretty easy to make. So here are the materials you will need.


Materials:
Stamp Sets: Your choice I used the Elements of Style from the Summer mini
Ink: Craft Stampin' Spots in a variety of colors, your choice. I used summer sun, lovely lilac, and melon mambo.
Accessories: Tile coasters from Home Improvement Store, Craft Ink, Blender Pens, Stazon Ink, Parchment Paper, Spatula, Kitchen towel and Baking sheet.
Directions:
1. Wash tiles 24 hours before use.
2. Stamp image with Stazon ink on coaster. Let stand for about 10 minutes.
3. Using a stamp block as a palet, stamp craft ink colors you would like to use on the block. I can get about 6 colors on a Stampin’ Up! “E” Block.
4. Using a blender pen, color your image. The colors will be very bright at first (this is ok), when they are baked in the oven the color will dim.
5. Bake in oven on parchment paper, for 6-10 minutes. They are very hot when you remove them from the oven. Using a spatula remove the tiles from the baking sheet, and place on a kitchen towel. Let cool about 30 minutes.
Gift Box:
1. Cut 8 x 11 or 12 x 12 piece of card stock to 8 ½ x 8 ½, color of your choice.
2. Score at 2 ¼ on all sides.
3. Trim 2 sides up to score line.
4. Put box together using sticky strip or mono glue to put box together.
5. I use decorated chip board in the bottom of the box for stability, I cut this at 3 15/16 x 3 15/16. (I use the paper that comes in the 12x12 DSP). I decorated it using a glue stick and DSP.
6. Wrap with Ribbon and add a tag and you have a great Teacher Gift or Christmas Gift
This is my first Blog Hop, and it is the first Annual Blog Hop for VC Rocks! VC is a super-fun group of stampers and SU! addicts. There is so much to do all summer - virtual hotel, doing swaps, taking classes online, and so much more! If you want to join the group, go to our blog and check it out. Deadline for new members is May 30.
I do hope you enjoyed the project. Thanks for stopping by and now on to the next stop on our hop, Ready Craft Create.


